
Easy Stripe checkout with use-shopping-cart and Next.js 14.
Recently, Vercel made a significant announcement at their fourth annual conference, unveiling Next.js 14. This latest version of the widely acclaimed React framework is a game-changer, promising enhanced speed and ease of use for developers.
You can read this also on Medium here.
In case you would like to have a look into the repo.
Next.js, renowned for its prowess in server-side rendering (SSR), static site generation (SSG), and incremental static regeneration (ISR), has been a go-to choice for creating dynamic, high-performance web applications.
Stripe is a comprehensive payment processing solution for businesses of all sizes. It simplifies online transactions by providing a seamless and secure payment platform. With Stripe, businesses can effortlessly accept various payment methods, including credit cards, digital wallets, and international currencies. Its robust API and extensive documentation make it a favorite among developers for integrating payment systems into web applications.
What is use-shopping-cart?
useShoppingCart is an elegant solution for managing shopping cart state and logic, specifically designed for Stripe checkout integration. Available at useshoppingcart.com, this tool expertly handles the intricacies of your cart’s details, streamlining the checkout process for a seamless user experience.

BEGINNING OUR JOURNEY WITH USE-SHOPPING-CART
Our first step is the installation of use-shopping-cart. You can easily add this package to your project using either of the following commands:
npm install --save use-shopping-cart

or

yarn add use-shopping-cart
After installation, it’s crucial to configure the package with your Stripe account’s publishable key, which you can find in your Stripe dashboard.
In this tutorial, I’m crafting a storefront using Sanity.io, a headless CMS, where I’ve already set up a few sample products. Our initial task is to create CartProvider and wrap our app's root component with it. This is vital to ensure that our shopping cart's state is managed effectively throughout the application.
1 — Setting Up the CartProvider (/providers/CartProvider.tsx)
Now, let’s dive into the creation of the CartProvider component. Located at /providers/CartProvider.tsx, this component is vital for integrating the shopping cart functionality in our app. Here's a look at the code structure:
"use client";

import { ReactNode } from "react";
import { CartProvider as USCProvider } from "use-shopping-cart";

export default function CartProvider({ children }: { children: ReactNode }) {
  return (
    <USCProvider
      mode="payment"
      cartMode="client-only"
      stripe={process.env.NEXT_PUBLIC_STRIPE_KEY as string}
      successUrl="http://localhost:3000"
      cancelUrl="http://localhost:3000/nowosci"
      currency="PLN"
      billingAddressCollection={true}
      shouldPersist={true}
      language="pl-PL"
    >
      {children}
    </USCProvider>
  );
}
In this setup, billingAddressCollection is a boolean flag allowing us to gather the customer's billing address, and shouldPersist enables the storage of cart data in local storage.
Next, integrate the CartProvider with the layout component. This requires wrapping the body components from the layout.ts file, effectively connecting the CartProvider (marked "use client") with the server-side layout component.
//all your necessary imports + CartProvider

import CartProvider from "@/providers/CartProvider";

export default function RootLayout({
  children,
}: {
  children: React.ReactNode;
}) {
  return (
    <html lang="en">
      <body className={`${inter.variable} ${playfair.variable}`}>
        <CartProvider>
          <ToastProvider />
          <TopBanner />
          <Navbar />
          <ShoppingCartModal />
          {children}
          <Footer />
        </CartProvider>
      </body>
    </html>
  );
}
Moving forward, our task is to construct the ShoppingCartModal. For this project, I'm utilizing TailwindCSS and shadcn. Given that this modal will interact directly with customers, it's essential to run it client-side, as indicated by the "use client" directive. We'll be incorporating the useShoppingCart hook from "use-shopping-cart", and as an initial step, we're just extracting the cartCount for testing purposes.
Here’s a glimpse at the ShoppingCartModal component:
"use client";

import {
  Sheet,
  SheetContent,
  SheetHeader,
  SheetTitle,
} from "@/components/ui/sheet";

import { useShoppingCart, formatCurrencyString } from "use-shopping-cart";

const ShoppingCartModal = () => {
  // const cartCount: number = 4;
  const { cartCount } = useShoppingCart();

  return (
    <>
      <Sheet defaultOpen>
        <SheetContent className="sm:max-w-lg w-[90vw]">
          <SheetHeader>
            <SheetTitle>Cart</SheetTitle>
          </SheetHeader>

          <div className="h-full flex flex-col justify-between">
            <div className="mt-8 flex-1 overflow-y-auto">
              <ul className="-my-6 divide-y divide-gray-200">
                {cartCount === 0 ? (
                  <h1 className="h3 py-6">You do not have any items</h1>
                ) : (
                  <h1 className="h3 py-6">Hey you have some items!</h1>
                )}
              </ul>
            </div>
          </div>
        </SheetContent>
      </Sheet>
    </>
  );
};

export default ShoppingCartModal;
Upon refreshing, we should see the modal open, displaying a message that reflects the current state of our cart.
2 — Enhancing the ShoppingCartModal with Additional Features
Now, let’s enrich our ShoppingCartModal by incorporating more properties and methods from useShoppingCart. This step will help us complete the modal with full functionality. Below is the updated code, including a comprehensive list of properties and their application:
"use client";

import axios from "axios";
import { toast } from "react-hot-toast";
import { Button } from "@/components/ui/button";
import { Input } from "@/components/ui/input";

import Image from "next/image";

import {
  Sheet,
  SheetContent,
  SheetHeader,
  SheetTitle,
} from "@/components/ui/sheet";
import { useShoppingCart, formatCurrencyString } from "use-shopping-cart";
import { on } from "events";

const ShoppingCartModal = () => {

  const {
    cartCount,
    shouldDisplayCart,
    handleCartClick,
    cartDetails,
    removeItem,
    totalPrice,
    redirectToCheckout,
  } = useShoppingCart();


  const items = Object.values(cartDetails ?? {}).map((entry) => entry.price_id);

  async function handleCheckoutClick(event: any) {
    event.preventDefault();

    try {
      const result = await redirectToCheckout();
      if (result?.error) {
        console.log("result");
      }
    } catch (err: any) {
      console.log(err.message);
    }
  }

  return (
    <>
      <Sheet open={shouldDisplayCart} onOpenChange={() => handleCartClick()}>
        <SheetContent className="sm:max-w-lg w-[90vw]">
          <SheetHeader>
            <SheetTitle>Cart</SheetTitle>
          </SheetHeader>

          <div className="h-full flex flex-col justify-between">
            <div className="mt-8 flex-1 overflow-y-auto">
              <ul className="-my-6 divide-y divide-gray-200">
                {cartCount === 0 ? (
                  <h1 className="py-6">You do not have any items</h1>
                ) : (
                  <>
                    {Object.values(cartDetails ?? {}).map((entry) => (
                      <li key={entry.id} className="flex py-6 ">
                        <div className="h-24 w-24 flex-shrink-0 overflow-hidden rounded-md border border-gray-200">
                          <Image
                            src={entry.image as string}
                            alt="Product Image"
                            width={100}
                            height={100}
                          />
                        </div>

                        <div className="ml-4 flex flex-1 flex-col">
                          <div>
                            <div className="flex justify-between text-base font-medium text-gray-900">
                              <h3>{entry.name}</h3>
                              <p className="ml-4">{entry.price} PLN</p>
                              <p className="mt-1 text-sm text-gray-500 line-clamp-2">
                                {entry.description}
                              </p>
                            </div>

                            <div className="flex flex-1 items-end justify-between text-sm">
                              <p className="text-gray-500">
                                QTY: {entry.quantity}
                              </p>

                              <div className="flex">
                                <button
                                  onClick={() => removeItem(entry.id)}
                                  type="button"
                                  className="font-medium text-primary hover:text-primary/80"
                                >
                                  Remove
                                </button>
                              </div>
                            </div>
                          </div>
                        </div>
                      </li>
                    ))}
                  </>
                )}
              </ul>
            </div>
            <div className="border-t border-gray-200 px-4 py-6 sm:px-6">
              <div className="flex justify-between text-base font-medium text-gray-900">
                <p>Subtotal</p>
                <p>{totalPrice} PLN</p>
              </div>
              <p className="mt-0.5 text-sm text-gray-500">
                Shipping and taxes are calculated at checkout
              </p>

              <div className="mt-6">
                <Button
                  onClick={handleCheckoutClick}
                  className="w-full bg-black text-white"
                >
                  Pay now
                </Button>
              </div>

              <div className="mt-6 flex justify-center text-center text-sm text-gray-500">
                <Button className="w-full mt-4">Continue shopping</Button>
              </div>
            </div>
          </div>
        </SheetContent>
      </Sheet>
    </>
  );
};

export default ShoppingCartModal;
This enhanced modal leverages the shouldDisplayCart property and handleCartClick() method from useShoppingCart to manage its display state:
<Sheet open={shouldDisplayCart} onOpenChange={() => handleCartClick()}>
To trigger the cart modal, consider updating components like your NavBar or any other area in your app where you’d like to provide access to the Cart.
"use client";

import Link from "next/link";
import { usePathname } from "next/navigation";
import { Button } from "@/components/ui/button";
import { Heart, Menu, Search, ShoppingBag, User } from "lucide-react";
import NavbarMobile from "./NavbarMobile";

// import useCart from "@/hooks/use-cart";
import { useShoppingCart } from "use-shopping-cart";

import { useRouter } from "next/navigation";

const links = [...];

const Navbar = () => {
  const pathname = usePathname();
  const router = useRouter();

  // destructuring to get handleCartClick()
  const { handleCartClick, cartCount } = useShoppingCart();

  return (
    <header className="mt-2 mb-2">
      <div className="flex items-center justify-between mx-auto max-w-2xl px-4 sm:px-6 lg:max-w-7xl">
        <Link href="/">
          <h1 className="text-2xl md:text-4xl font-playfair font-bold">
            Gibbarosa
          </h1>
        </Link>

        <nav className="hidden gap-12 lg:flex 2xl:ml-16 mt-2">
          {links.map((link, idx) => (
            <div key={idx}>
              {pathname === link.href ? (
                <Link
                  className="text-[14px] text-black underline"
                  href={link.href}
                >
                  {link.name}
                </Link>
              ) : (
                <Link
                  href={link.href}
                  className="text-[14px]  text-gray-600 transition duration-100 underline-effect"
                >
                  {link.name}
                </Link>
              )}
            </div>
          ))}
        </nav>

        <div className="flex items-center">
          <Button className="bg-transparent text-black">
            <Search size={18} />
          </Button>
          <Button className="bg-transparent text-black">
            <User size={18} />
          </Button>
          <Button className="bg-transparent text-black">
            <Heart size={18} />
          </Button>

          {/* destructuring to get handleCartClick() */}

          <Button
            onClick={() => handleCartClick()}
            className="bg-transparent text-black"
          >
            <ShoppingBag size={18} />
            <span>{cartCount}</span>
          </Button>
        </div>

        {/* Mobile Navbar */}
        <NavbarMobile />
      </div>
    </header>
  );
};

export default Navbar;
3 — Crafting the AddToCart Component with useShoppingCart
The next step in our journey is to develop the AddToCart component. This component will utilize useShoppingCart to handle a variety of product attributes such as name, currency, description, price, image, and the price_id (which is generated by Stripe when a product is added to the Stripe dashboard).
"use client";

import { Button } from "@/components/ui/button";
import { useShoppingCart } from "use-shopping-cart";
import { urlFor } from "@/lib/sanity";

export interface ProductCart {
  name: string;
  description: string;
  price: number;
  currency: string;
  image: any;
  price_id: string;
}

const AddToCart = ({
  name,
  currency,
  description,
  price,
  image,
  price_id,
}: ProductCart) => {
  const { addItem, handleCartClick } = useShoppingCart();

  const product = {
    name: name,
    description: description,
    price: price,
    currency: currency,
    image: urlFor(image).url(),
    price_id: price_id,
  };

  return (
    <div>
      <Button
        onClick={() => {
          addItem(product), handleCartClick();
        }}
        className="bg-black text-white w-full"
      >
        Add to Cart
      </Button>
    </div>
  );
};

export default AddToCart;
This component simplifies the process of adding products to the shopping cart. It’s designed to be integrated into product pages, like app/product/[slug], where it can accept product properties directly.
As a note, I’m leveraging Sanity.io, a headless CMS, for building the storefront. This approach involves using groq queries to import product data based on the Sanity-generated slug.
import Image from "next/image";
import { client } from "@/lib/sanity";
import { fullProduct } from "@/interface";
import ImageGallery2 from "@/components/ImageGallery2";
import { Button } from "@/components/ui/button";

import {
  Accordion,
  AccordionContent,
  AccordionItem,
  AccordionTrigger,
} from "@/components/ui/accordion";

import AddToCart from "@/components/AddToCart";

import MidBanner from "@/components/MidBanner";
import Newsletter from "@/components/Newsletter";
import YouMayLike from "@/components/YouMayLike";

async function getData(slug: string) {
  const query = `*[_type == "product" && slug.current == "${slug}"][0] {
        _id,
          images,
          name,
          brand,
          price,
          condition,
          size,
          description,
          tags,
          "slug": slug.current,
          "categoryName": category -> name,
          price_id,

      } `;

  const data = await client.fetch(query);

  return data;
}

const ProductPage = async ({ params }: { params: { slug: string } }) => {
  const data: fullProduct = await getData(params.slug);

  return (
    <section className="mt-20 mx-auto max-w-2xl px-4 sm:pb-6 lg:max-w-7xl lg:px-8">
      <div className="grid gap-8 md:grid-cols-2">
        <ImageGallery2 images={data.images} />

        <div className="flex flex-col">
          {/* KEY INFO */}
          <div>
            <h1 className="h4">{data.brand}</h1>
            <h1 className="h2">{data.name}</h1>
            <p className="mt-4">{data.description}</p>
            <h1 className="mt-6 text-3xl font-bold">{data.price} PLN</h1>
          </div>

          {/* SIZES */}
          <div className="mt-4 mb-4">Size:</div>

          {/* OTHER */}

          <div className="mt-6 flex space-x-8">
            <div className="flex-col">
              <div className="mb-2 text-sm uppercase text-gray-400">Condition</div>
              <div className="mb-2 text-sm uppercase text-gray-400">
                Size
              </div>
              <div className="mb-2 text-sm uppercase text-gray-400">
                Accessories
              </div>
            </div>
            <div className="flex-col">
              <div className="mb-2 text-sm capitalize">{data.condition}</div>

            </div>
          </div>

          {/* ADD TO CART BUTTON */}
          <AddToCart
            key={data._id}
            currency="PLN"
            description={data.description}
            image={data.images[0]}
            name={data.name}
            price={data.price}
            price_id={data.price_id}
          />

          {/* PRODUCT ACCORDION */}
          <Accordion
            type="single"
            collapsible
            defaultValue="item-1"
            className="w-full"
          >
            .....
          </Accordion>
        </div>
      </div>

      <YouMayLike />
      <MidBanner />
      <Newsletter />
    </section>
  );
};

export default ProductPage;
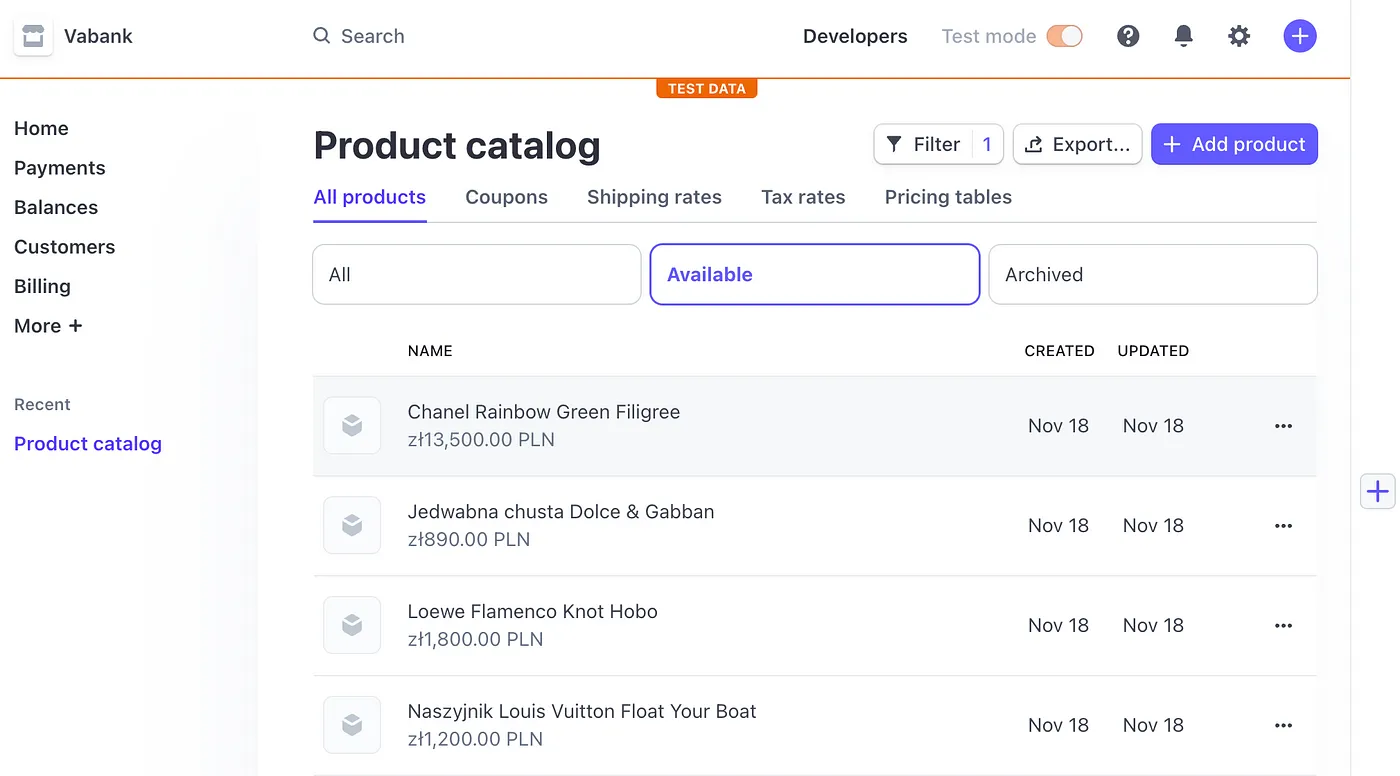
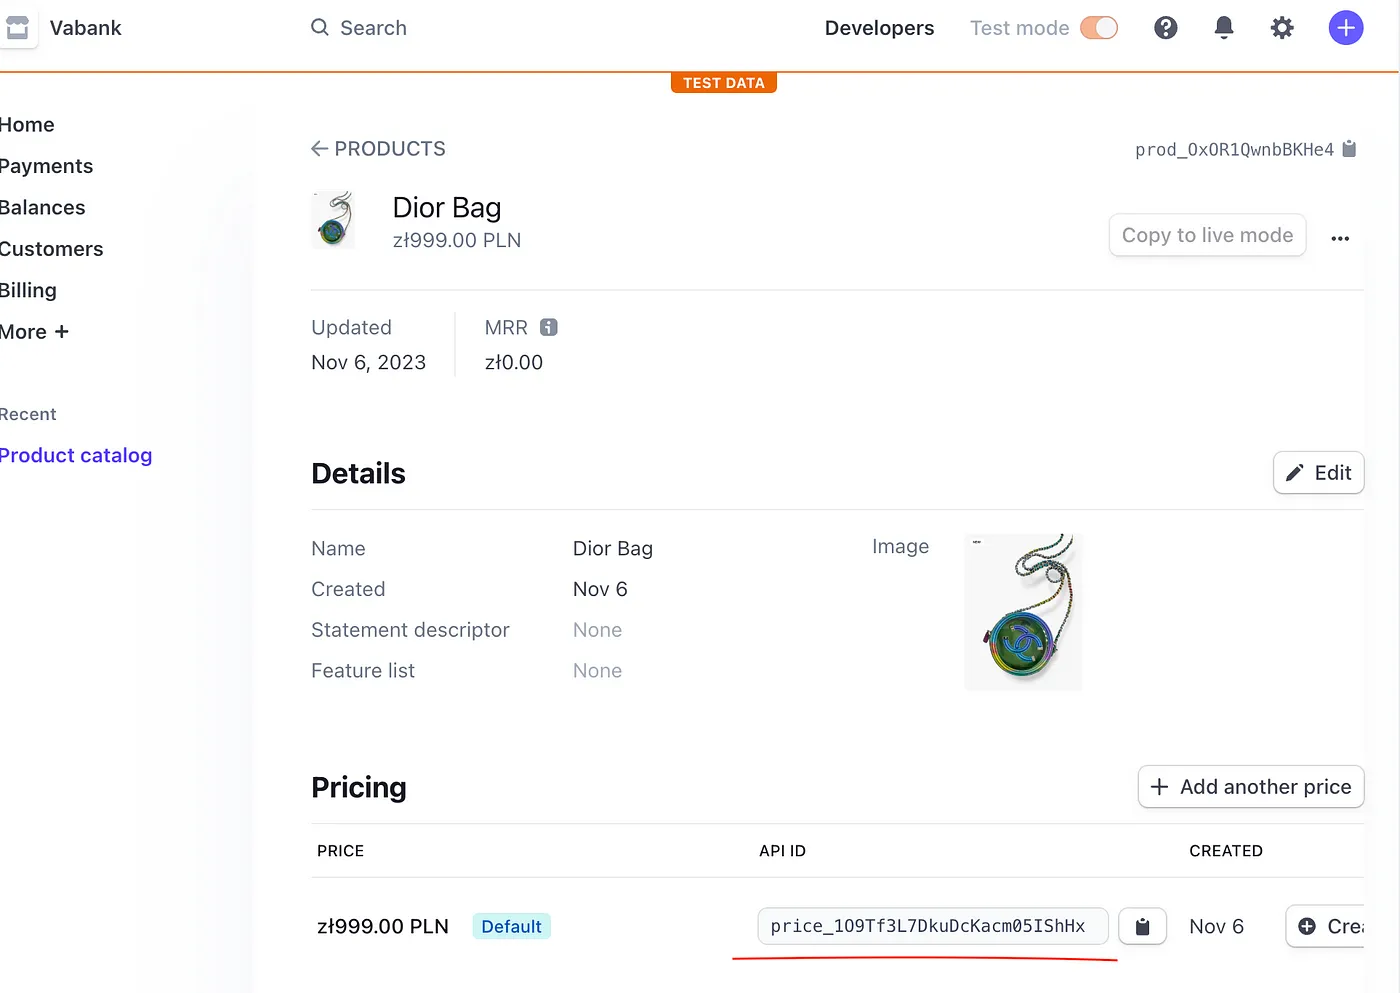
4- Check the below screens on how to add product to Stripe and get price_id.
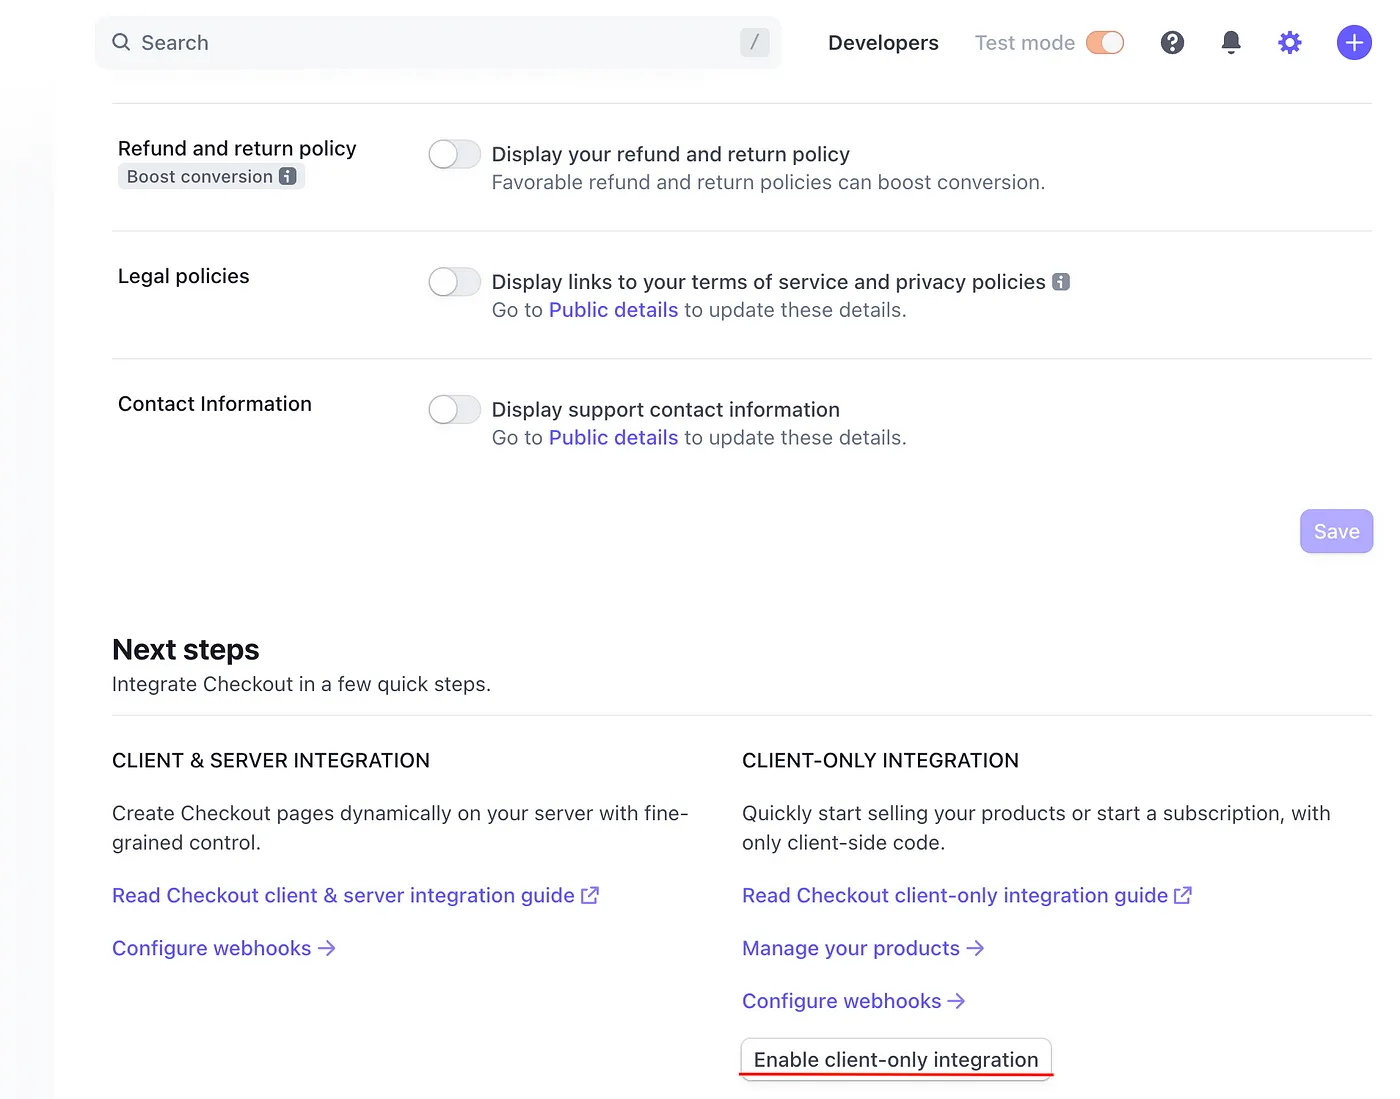
It’s important to activate the ‘client-only integration’ feature in your Stripe dashboard. You can do this by visiting Stripe’s Checkout Settings. This setting is crucial for the proper functioning of the integration with your application.
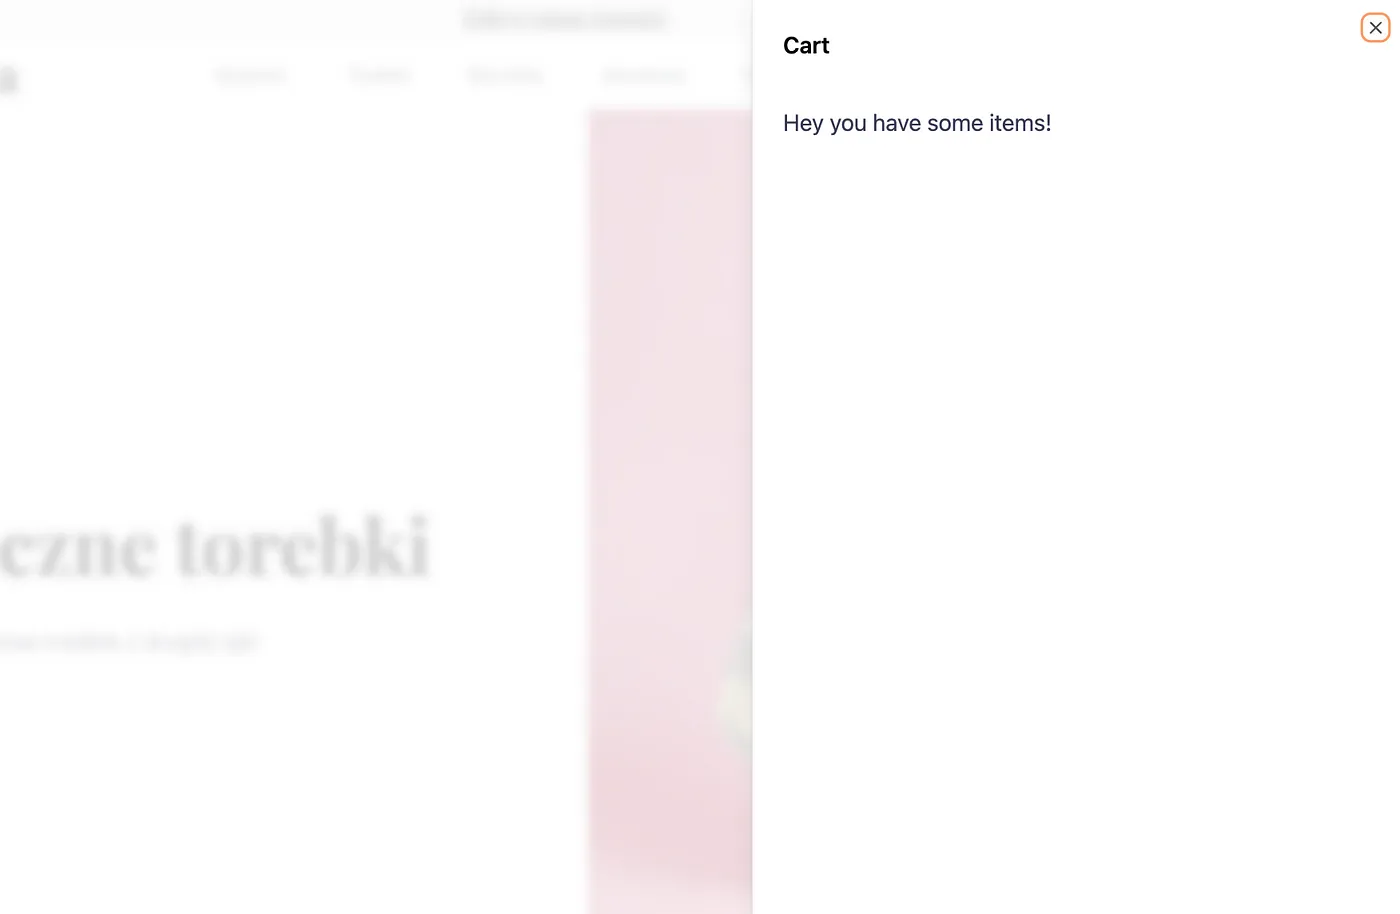
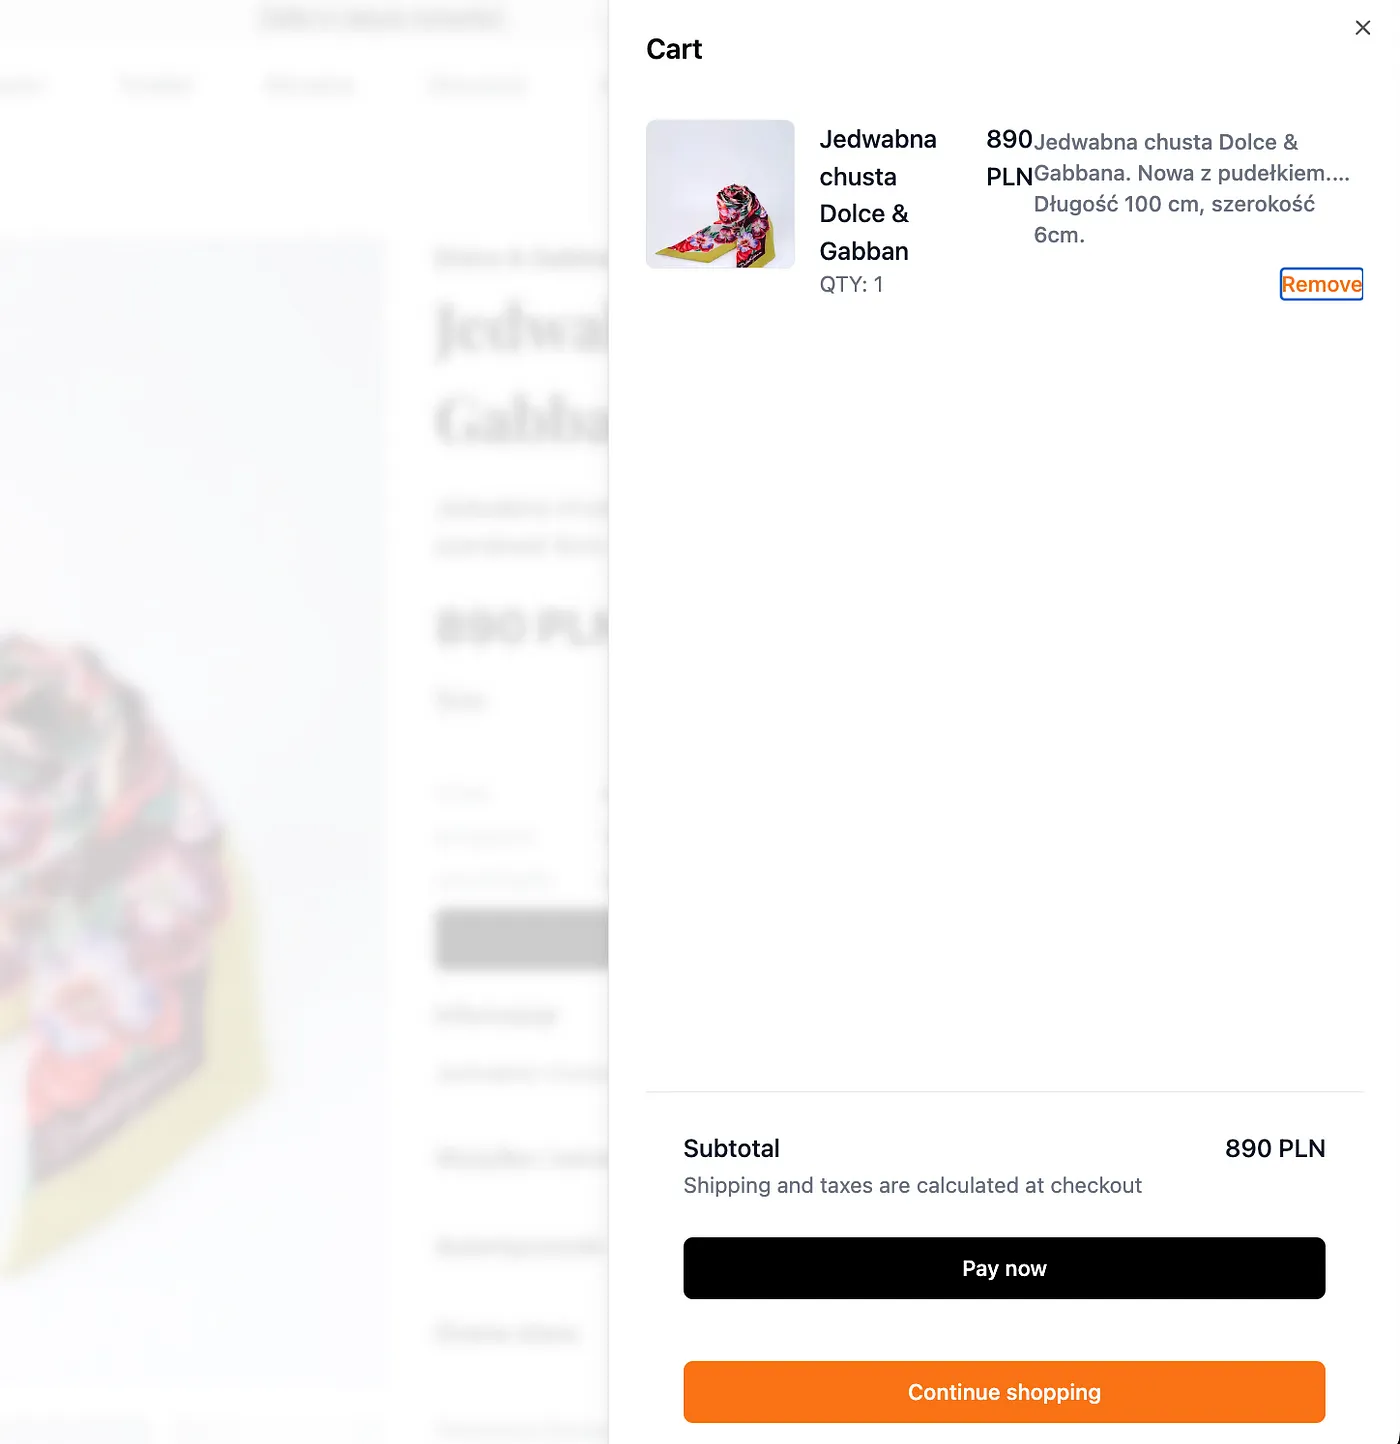
Here’s what you can expect to see once a product has been successfully added to the cart. This view provides a clear indication that the item has been integrated into your shopping cart effectively.
CONCLUSION: Navigating the Integration of Stripe Checkout and use-shopping-cart
I attempted to guide you through the process of integrating Stripe checkout with use-shopping-cart in a Next.js 14 framework. Our journey began with the initial setup of use-shopping-cart, followed by the intricate configuration of the CartProvider. We then delved into creating the ShoppingCartModal and the AddToCart component, ensuring a fluid user interaction with the shopping cart.
Happy coding :)
Piotr